A Deep Dive into Latent Diffusion model - Stable Diffusion
Published:
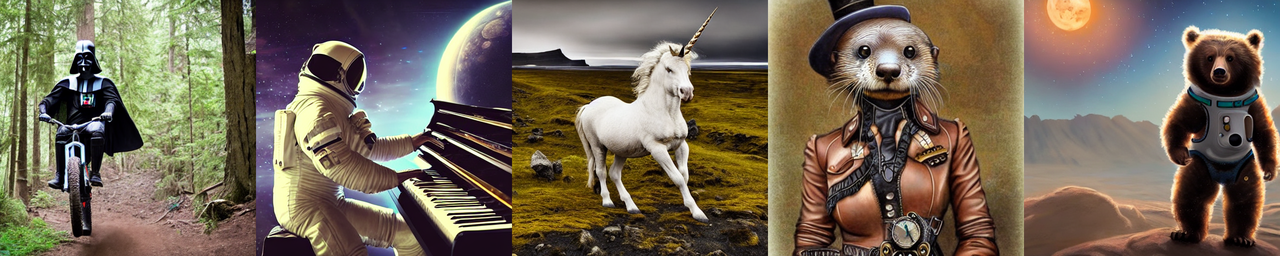
AI image generation is one of the notable AI advances recently. The ability to create striking visuals from text descriptions has a magical quality to it and points clearly to a shift in how humans create art. The release of Stable Diffusion is a clear milestone in this development because it made a high-performance model available to the masses (performance in terms of image quality, as well as speed and relatively low resource/memory requirements).
Before Stable Diffusion took the world by storm, there are other image generation techniques such as GAN and VAE. However, the image qualities of these methods are not very good.
Dall-E is the first image generation that can produce impressive results, however the model weights are not released publicly. OpenAI only released the APIs. Dall-E uses Diffusion model with a CLIP representation to generate the output image. Stable diffusion follows the same set up, but releases the model to the public use. Stable diffusion model is available on Huggingface.
History: Stable Diffusion is a collaboration between the researchers at Ludwig Maximilian University of Munich, Germany and Runway ML. Stability AI only provides compute resources.
 |  |  |
|---|---|---|
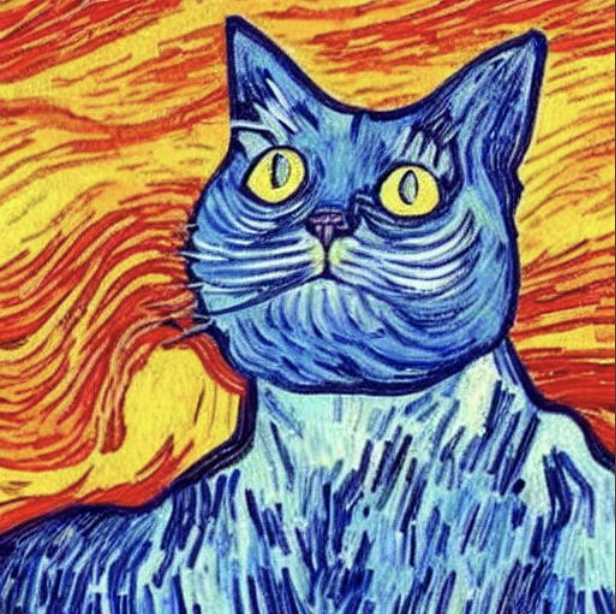
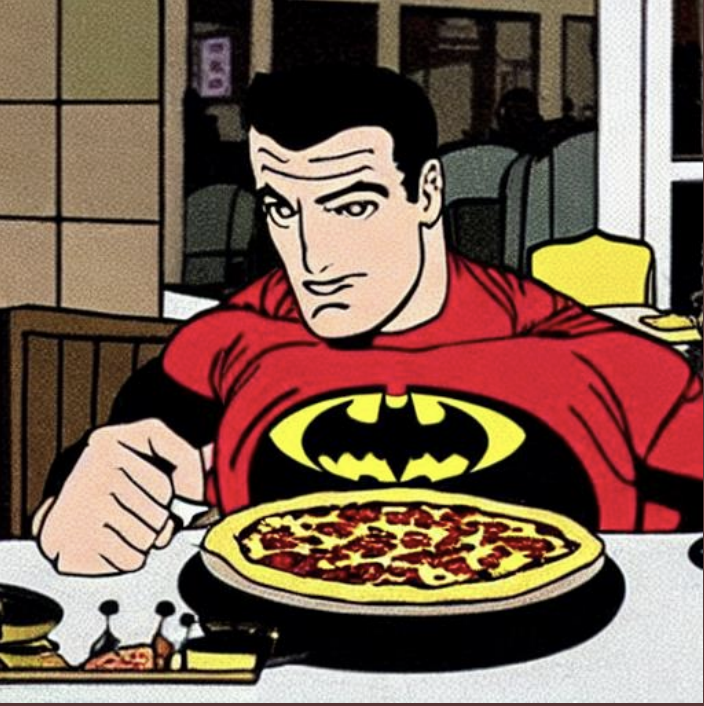
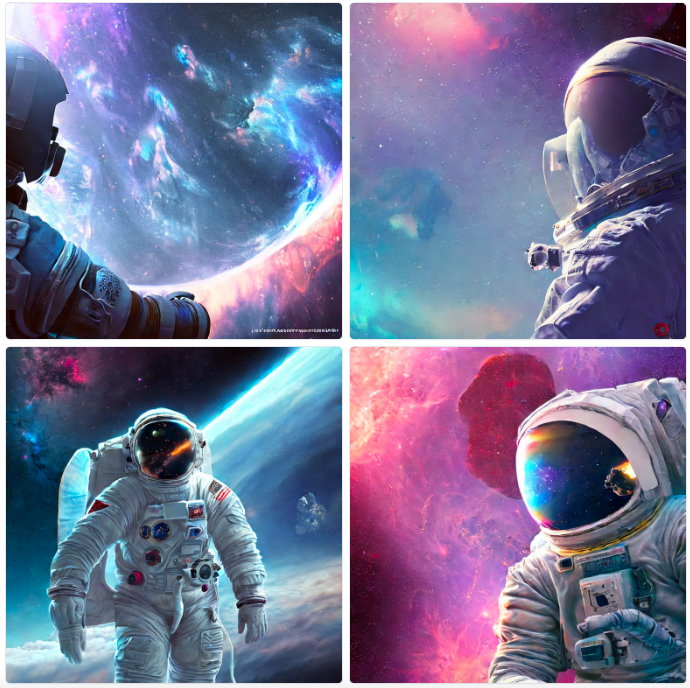
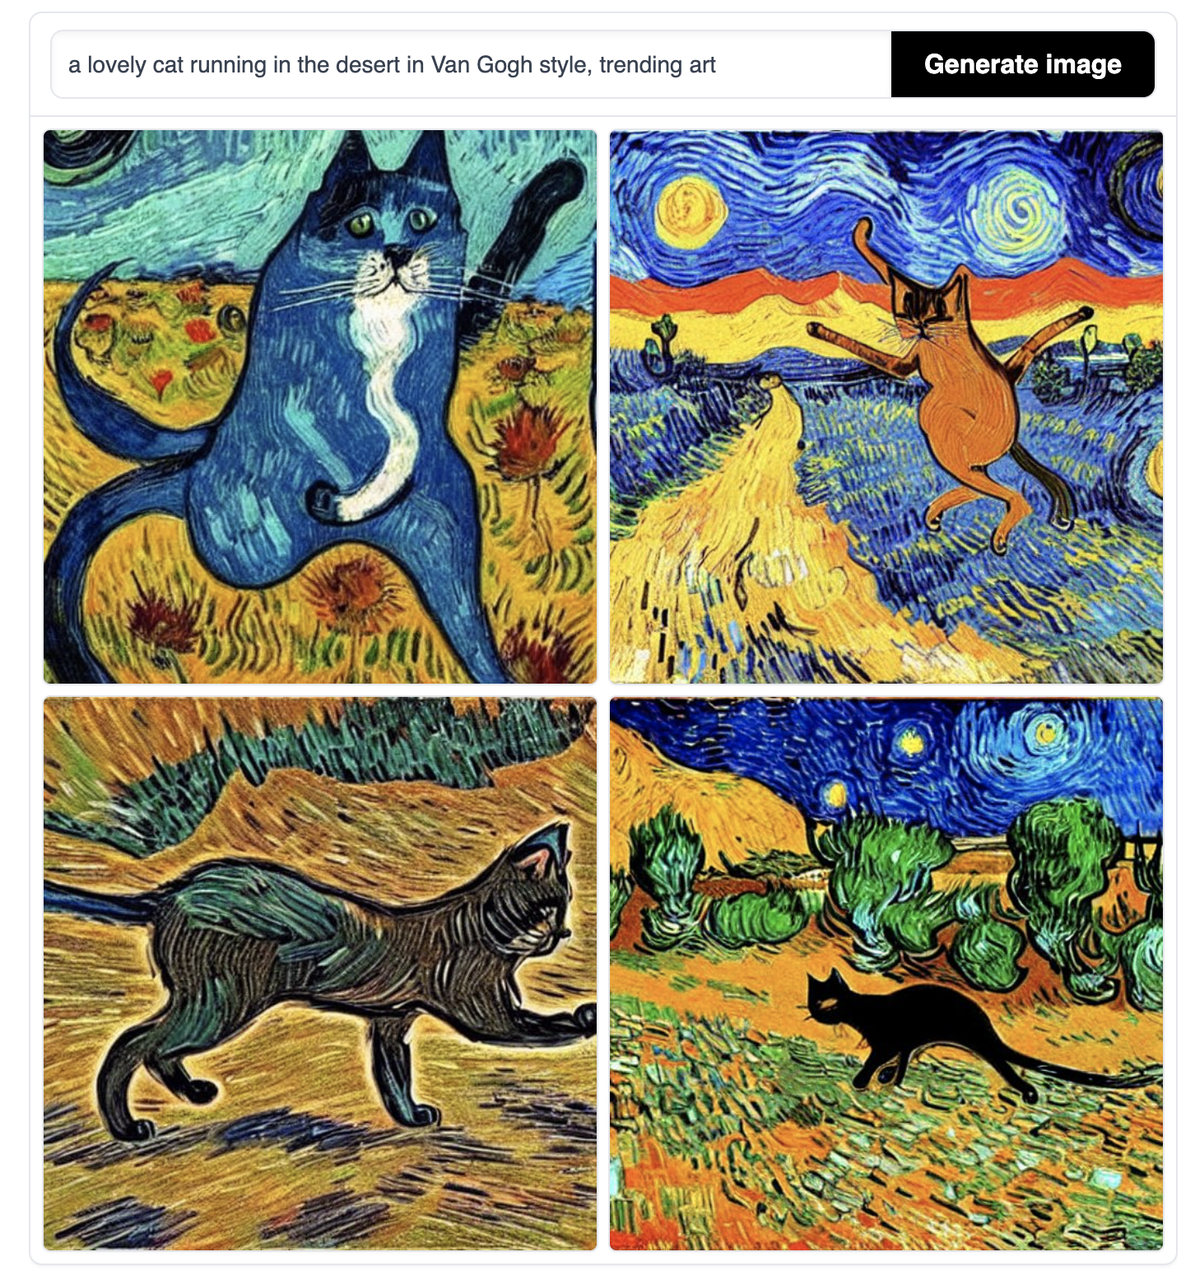
| “a lovely cat running in the desert in Van Gogh style, trending art” | “Batman eating pizza in a diner” | “astronaut looking at a nebula, digital art, trending on artstation, hyperdetailed, matte painting” |
Here is the paper that we will go through today:

1. Overview of Stable Diffusion
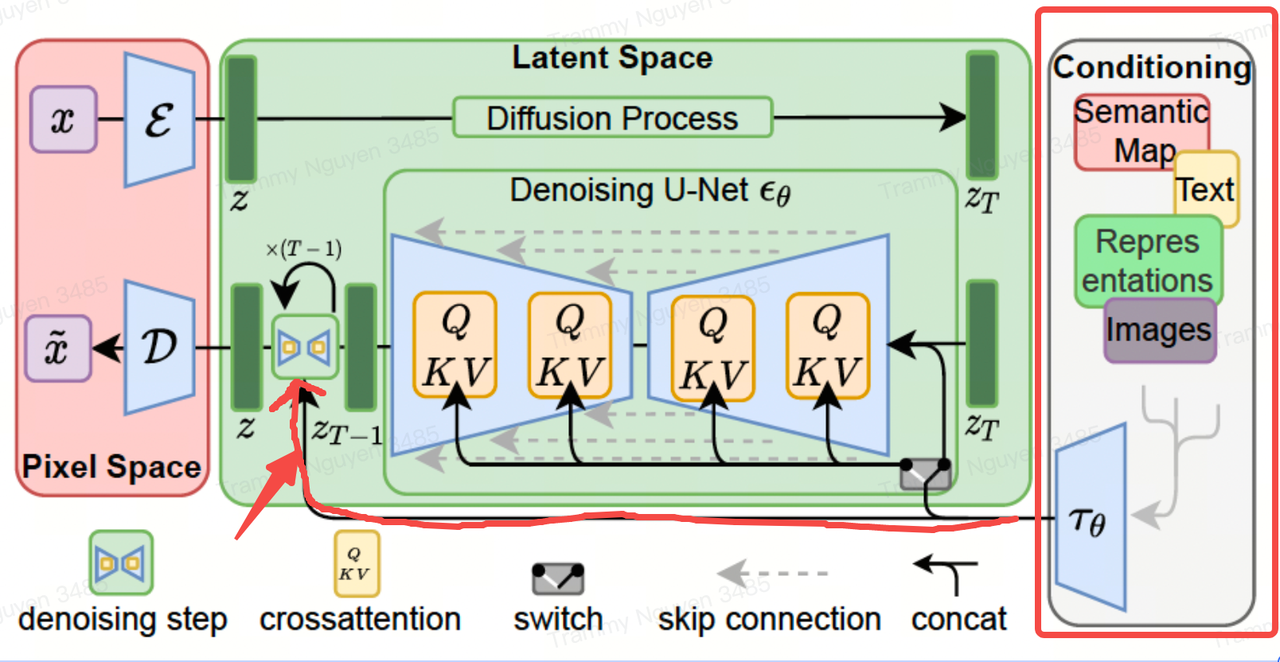
Stable Diffusion is a system made up of several components and models. It is not one monolithic model.
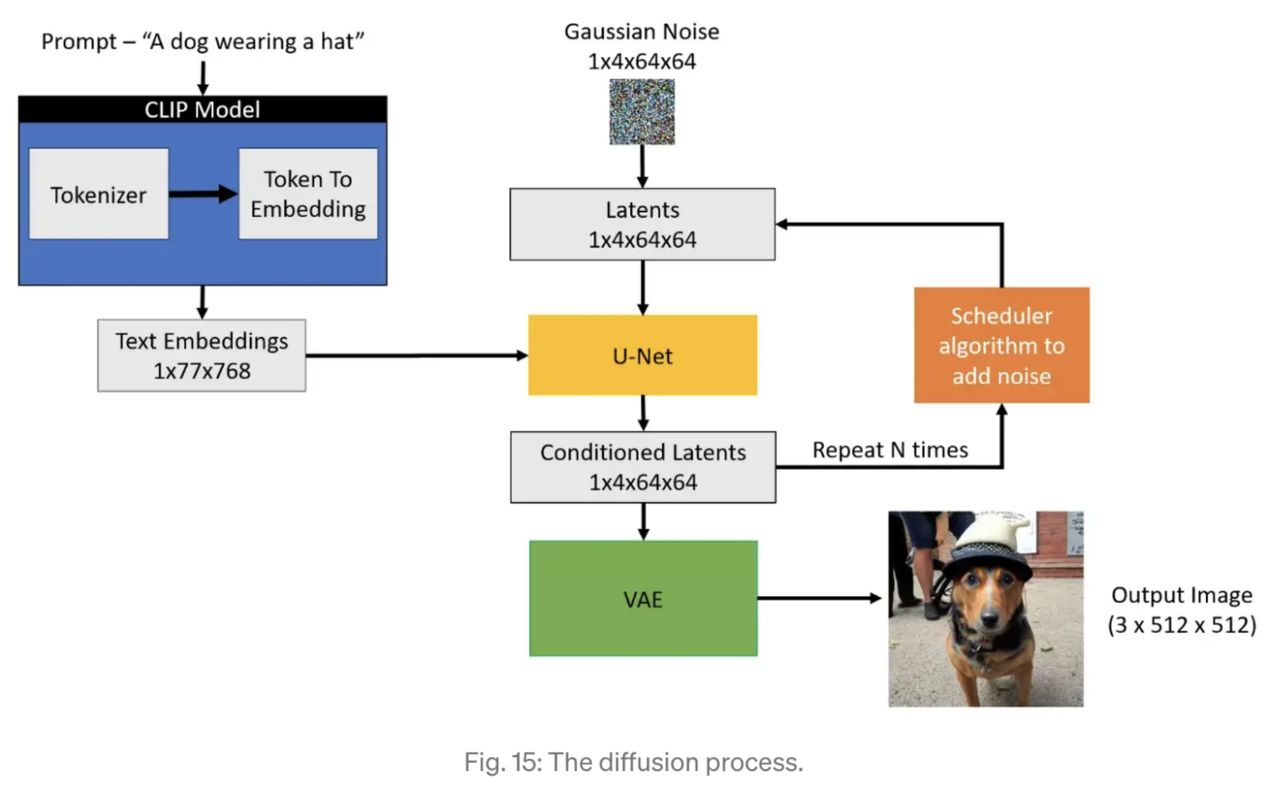
The picture below shows the flow of generating image from a text input.
Given a prompt such as “A dog wearing a hat”, the text is tokenized and converted to embeddings using the CLIP model.
At the same time, a Gaussian Noise image is initialized as a Latent image. A U-net is used to convert from the Gaussian noise and text embedding to a conditioned latent image. The process is repeated N times using a scheduler algorithm to iteratively add noise to the image and produce better conditioned latents. This is called the diffusion process.
The output latent image is fed into a VAE to decode the latent image. The output of VAE produces the desired generated image.

On the training side, in order to train the components, here are the steps.
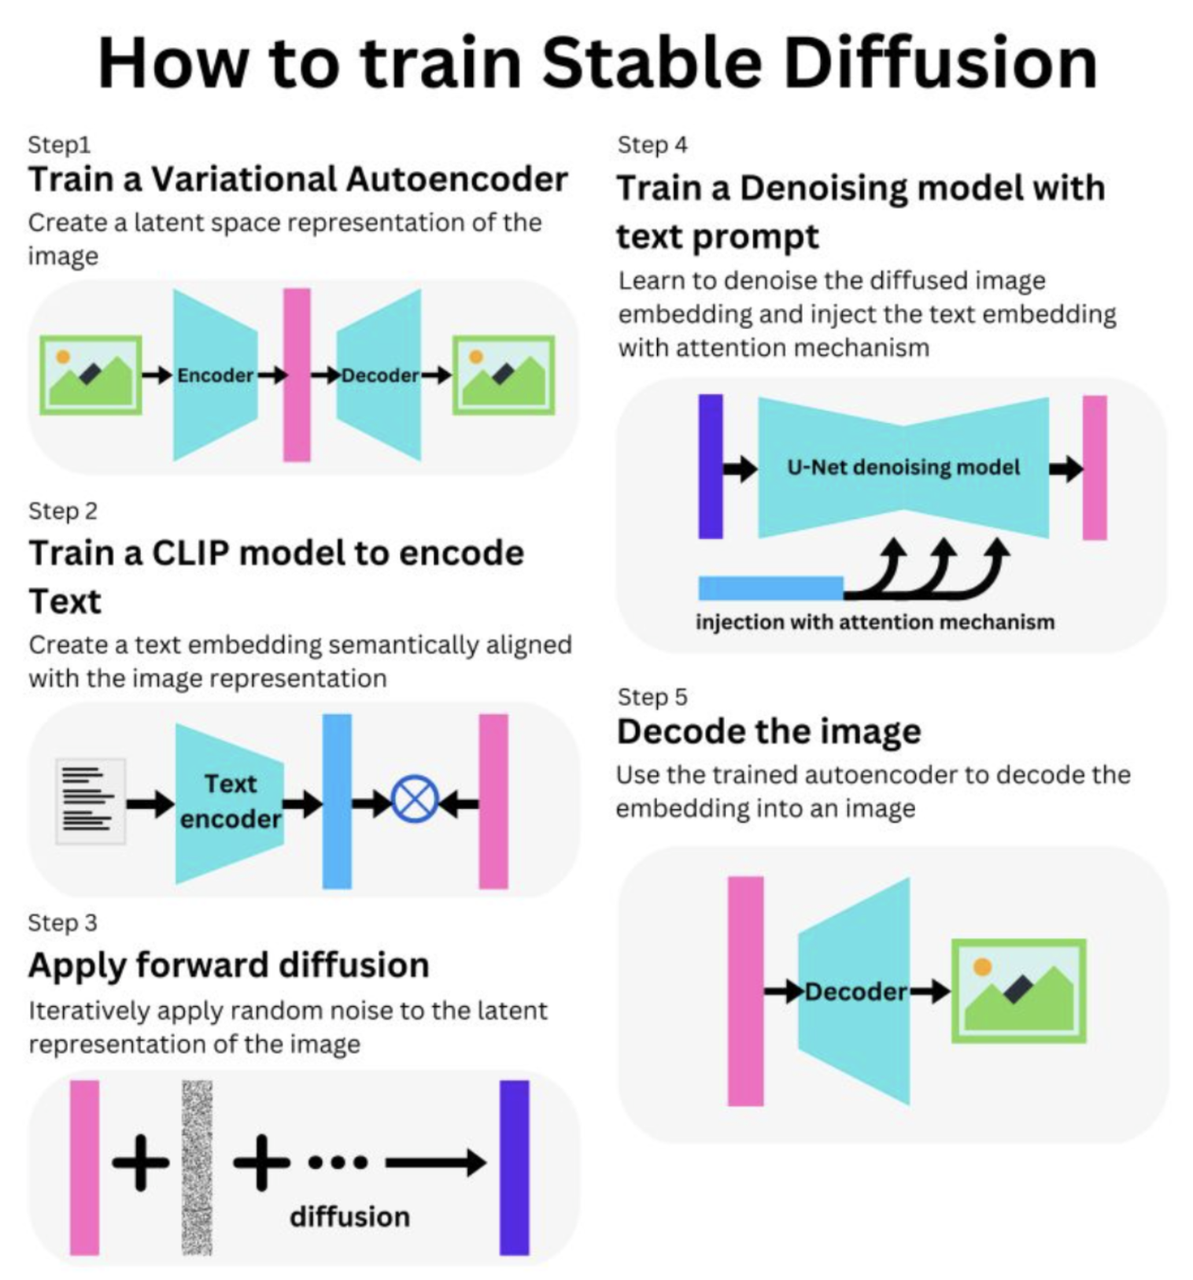 | 1. Train VAE: train model to encode image semantics into the model 2. Train CLIP model: CLIP is a bimodal text-image self-supervised learning 3. Forward Diffusion: to inject noise to the image 4. Train Denoising model: learn to denoise the diffused image and text embedding 5. Decoder: Use the trained autodecoder in step 1 to decode the embedding into an image |
2. Stable Diffusion components
2.1 Text encoder (CLIP)
CLIP (Contrastive Language–Image Pre-training) is a zero-shot transfer, natural language supervision, and multimodal learning. The training process involves a pair of image and its text caption, and trained in a contrastive self-supervised manner. The purpose is to learn a joint encoding space for text caption and image.
Contrastive learning maximizes the representation similarity between an image and its caption and minimizes other pairs. Since it is self-supervised, there is no label besides the (image, text) pairs. By training the model to reward image and its corresponding caption while penalizing similarity to other pairs, we force the model to learn and combine semantics for the image and its corresponding text.
The output of text encoder is the text embedding, and the output of the image encoder is the image embedding.
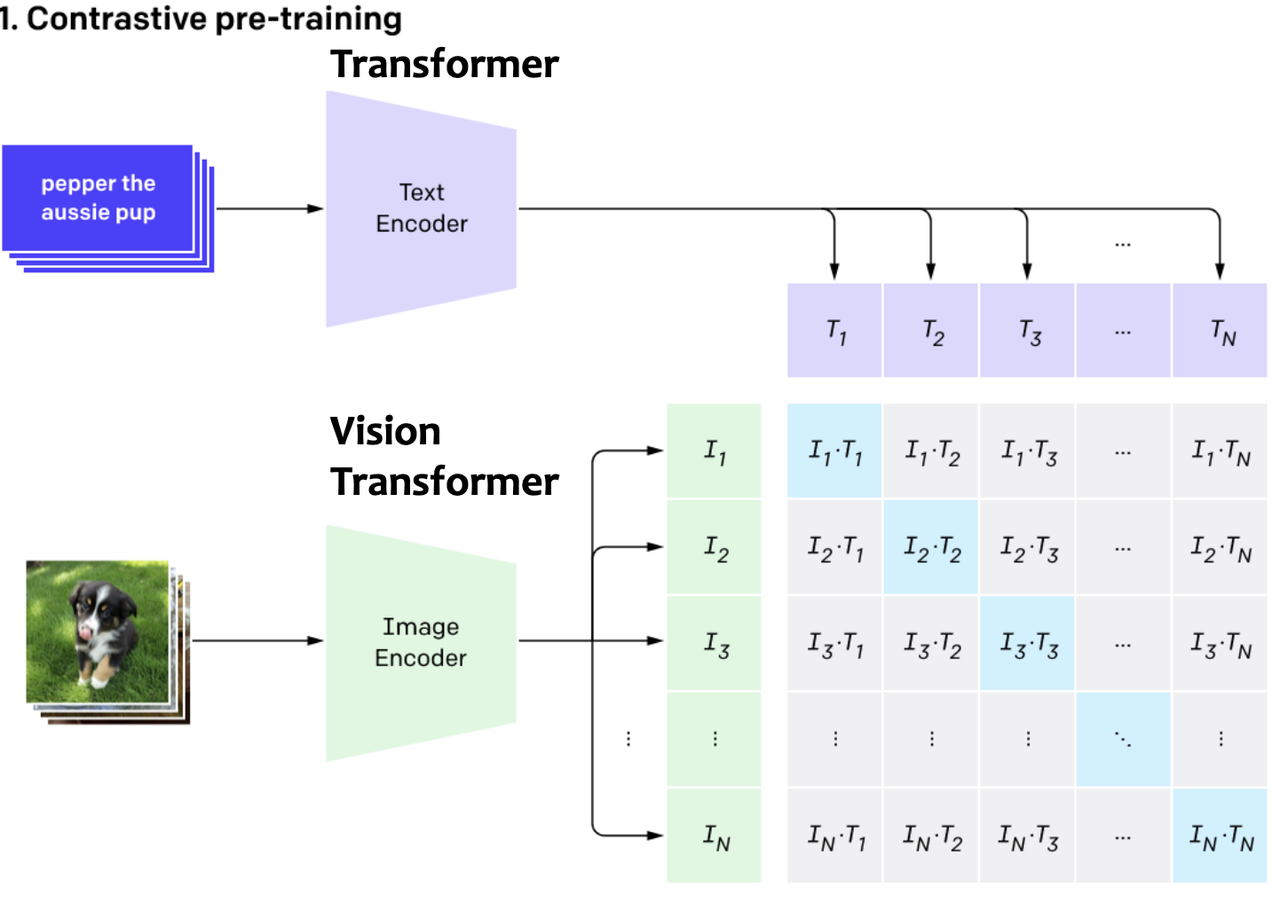
Stable Diffusion uses the text embedding of CLIP to represent the text prompts.
2.2 Variational Autoencoder (VAE)
VAE: Given an image $x \in R^{H\times{W}\times{3}}$ in RGB space, the encoder $E$ encodes $x$ into a latent representation $z=E(x)$, and the decoder $D$ reconstructs the image from the latent, giving $\hat{x}=D(z)=D(E(x))$
Variational Autoencoder is an unsupervised method to learn an embedding of any input data. The encoding process learns a latent representation of the input such that the decoding phase can reconstruct back the input from the latent vector.
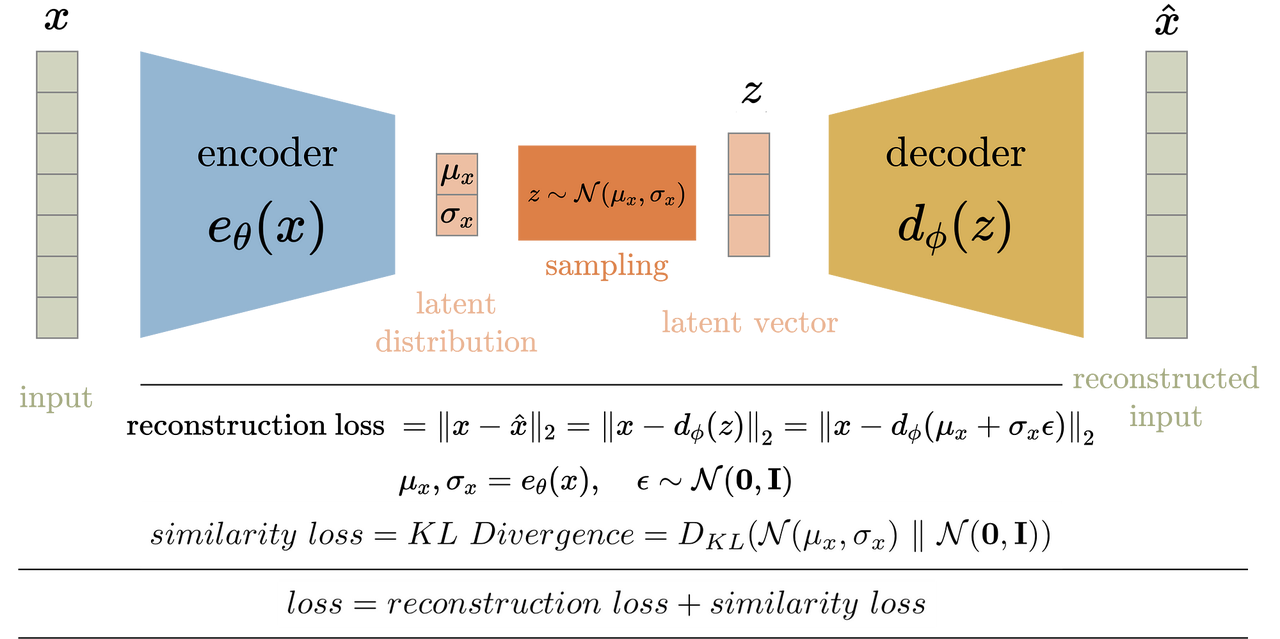
2 regularization options used in the paper:
KL-reg: similar set up to a normal VAE, make latent distribution like Gaussian distribution.
VQ-reg: make the latent representation quantized to be a set of discrete tokens
Why do we need Autoencoder?
The purpose of having the VAE in Stable Diffusion is to compress the image from pixel space to a latent space. The main contribution of Stable Diffusion is applying diffusion model on the latent space, rather than pixel space, resulting in less computation, faster training speed and faster inference time.
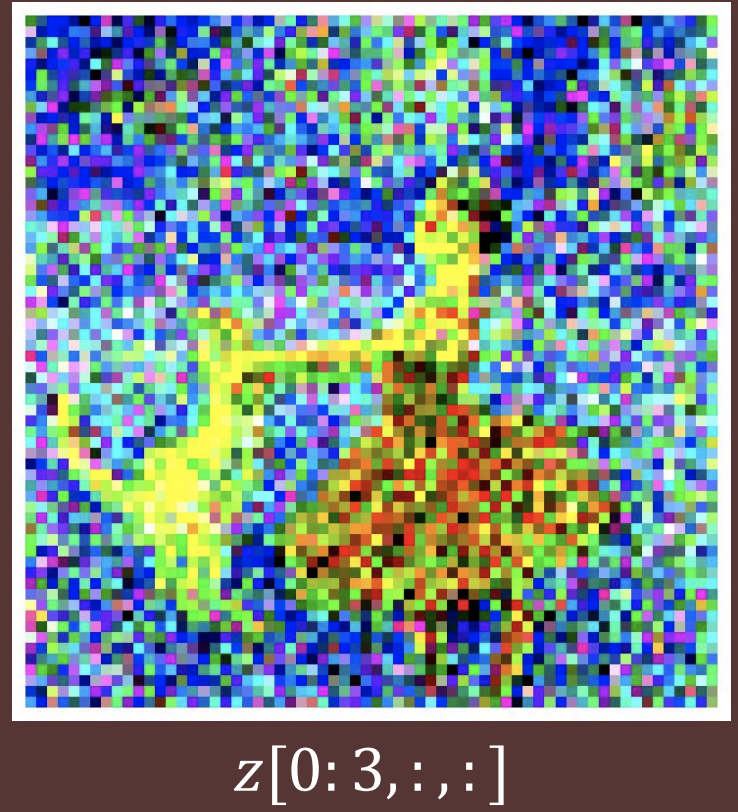
^ Latent state contains a “sketch version” of the image
How much to compress?
In the paper, the author calls the VAE encoding process as a perceptual compression step. This means the VAE compresses the image perception to a dense vector representation. The encoder downsamples the image by a factor $f$, and they experiment with various values for $f\in{1, 2, 4, 8, 16, 32}$
$f={1,2}$ results in slow training progress, while $f=32$ compresses too much that results in information loss and limiting the quality
$f={4,8,16}$ strikes a good balance between efficiency and perceptually faithful results
We only need to train VAE once, and reuse for multiple Diffusion model trainings.
2.3 Diffusion model
“Creating noise from data is easy; Creating data from noise is generative modeling.”
Diffusion Models are probabilistic models designed to learn a data distribution $p(x)$ by gradually denoising a normally distributed variable, which corresponds to learning the reverse process of a fixed Markov Chain of length T.
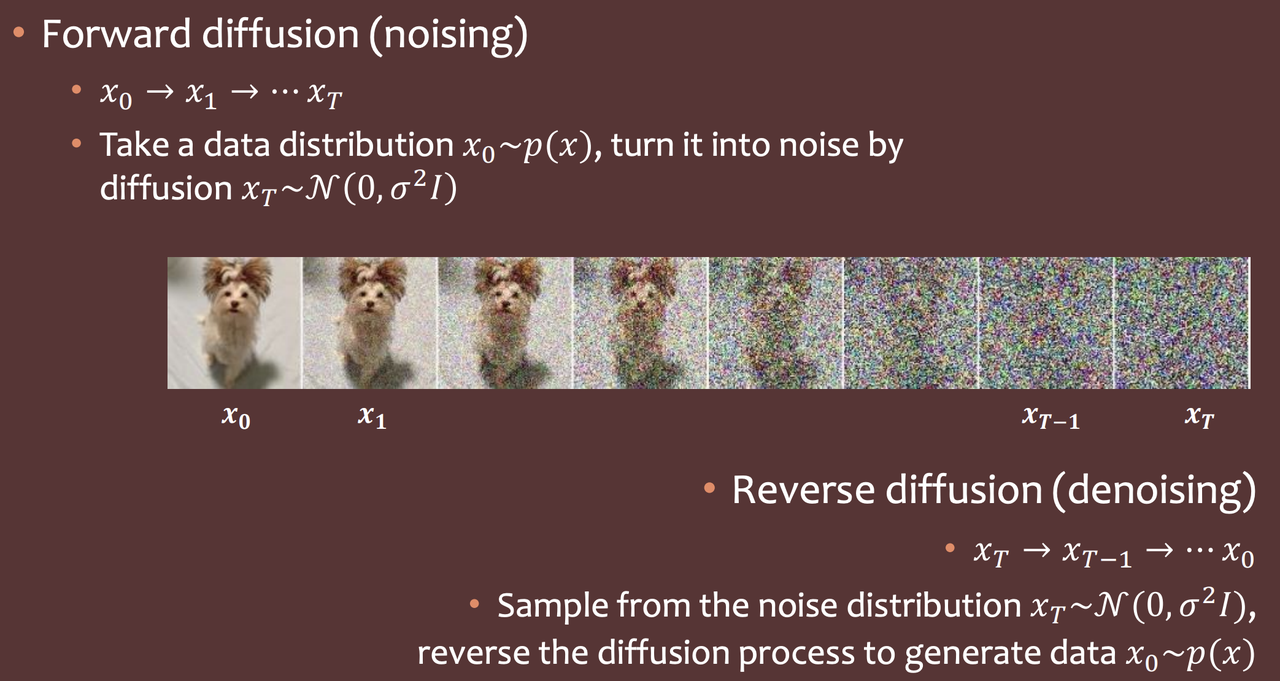
There is a forward diffusion process and a reverse diffusion process.
Forward diffusion (Noising): turn a normal image into noise, by iteratively adding Gaussian noise to the photo.
Reverse diffusion (Denoising): turn from noise back to normal image
Math formulation of the forward diffusion process:
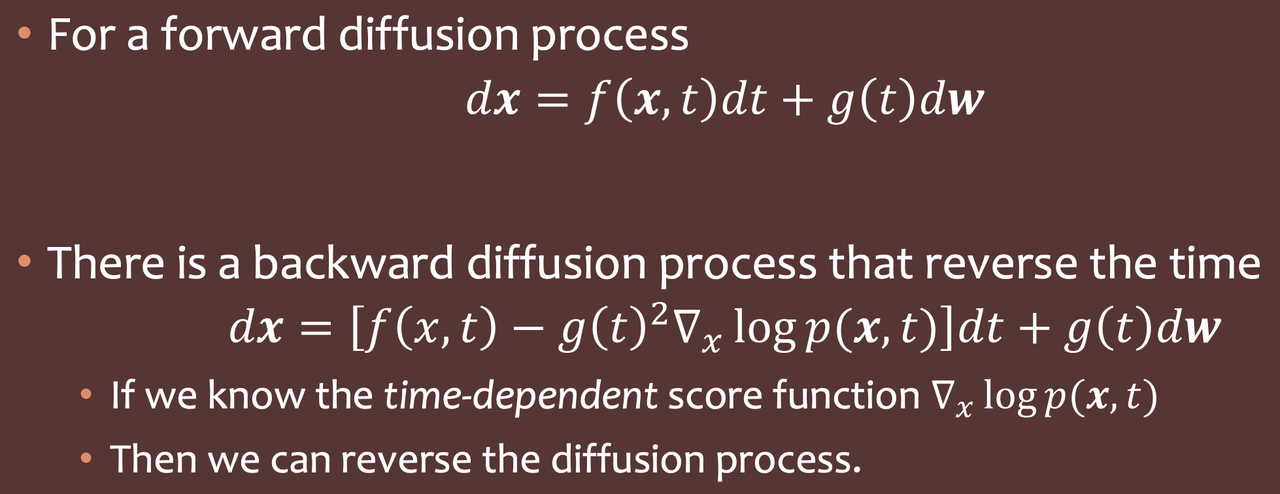
(More math details for diffusion model can be found at https://lilianweng.github.io/posts/2021-07-11-diffusion-models/)
Diffusion model learns to denoise a normally distributed image (reverse diffusion), helping to the generative process. The key is to fit the score function $\Delta_x\log{p(x,t)}$ in the backward diffusion process. Once we find the score function, we can reverse the diffusion process and generate image from noise (denoising model).
Stable Diffusion trains a conditioned score model using U-net to approximate image to image mapping.
2.4 U-Net
2.4.1 U-Net architecture
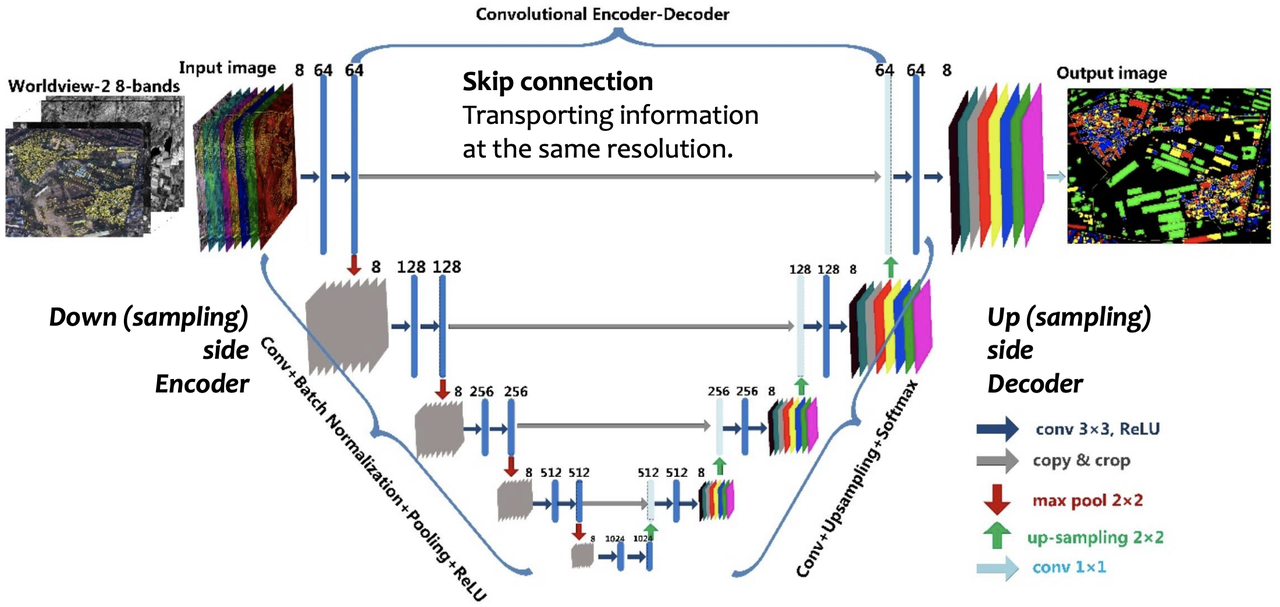
U-Net is a common CNN architecture used for image segmentation (pixel classification). The output of the model is the same size as the input. Every pixel is a classification space.
There are two parts to a U-net. The first part is a downsampling part, which is to condense the input image to a feature map of a much smaller size. Downsampling has many CNN layers, similar to typical CNN models like ResNet, VGG, etc. The usual components like convolutional layers, Batch Norm, Pooling and ReLU are all present.
The second part is upsampling, which is to construct an image from the feature map representation. Upsampling uses deconvolutional layers to inflate from smaller-sized vector maps to bigger vector maps. The end result of upsampling is the same size as the original input.
There is a skip connection from a downsampling layer to an upsampling part, so as to condition the generative process with the information from the downsampling process.
U-Net in Stable Diffusion
Stable Diffusion uses U-Net as a function approximator for the diffusion denoising model. If there are T steps during the forward diffusion process, U-Net is called T times during the reverse diffusion process. Each time, U-Net is augmented with a Cross Attention mechanism.
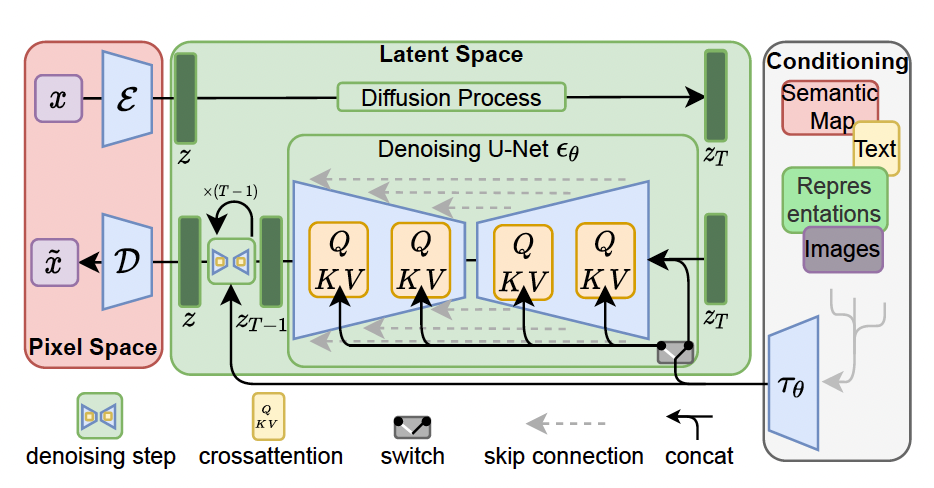
2.4.2 Cross Attention in U-Net
To pre-process y from various modalities (such as text prompts) we introduce a domain specific encoder that projects $y$ to an intermediate representation which is then mapped to the intermediate layers of the UNet via a cross-attention layer implementing $Attention(Q,K,V)=softmax(\frac{QK^T}{\sqrt{d}}) . V$
Self Attention: Tokens in a language pay attention to each other.
Cross attention: Tokens in one language pay attention to tokens in another. In this case, tokens in the noised image input pay attention to the text prompts.
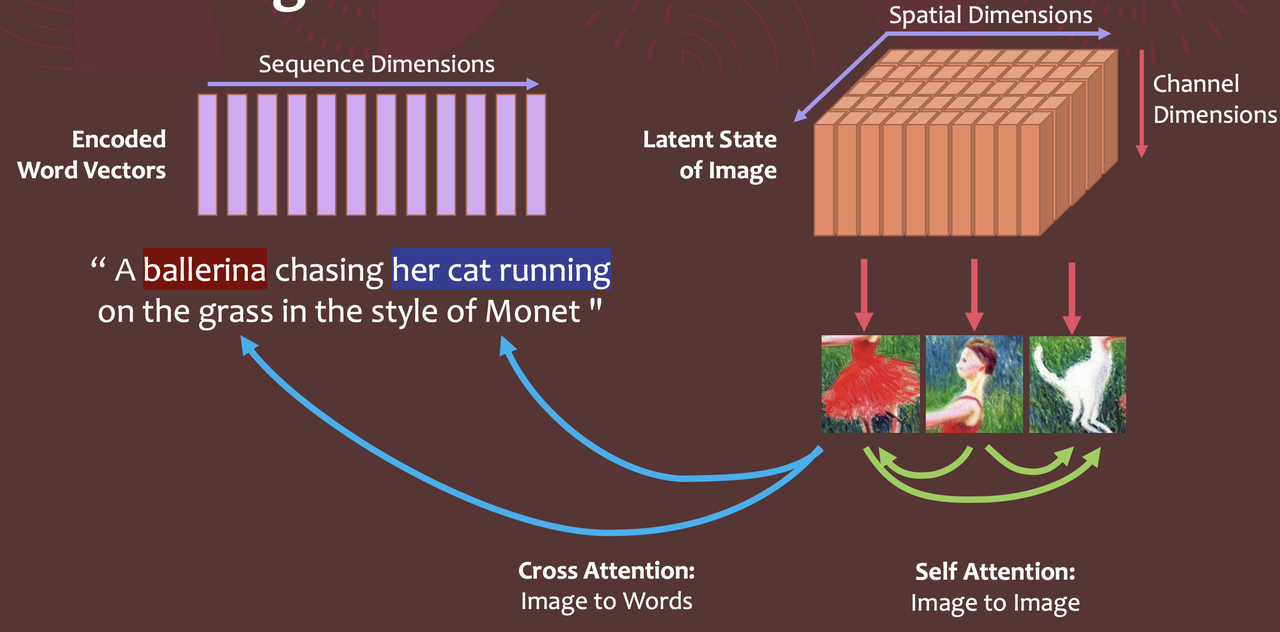
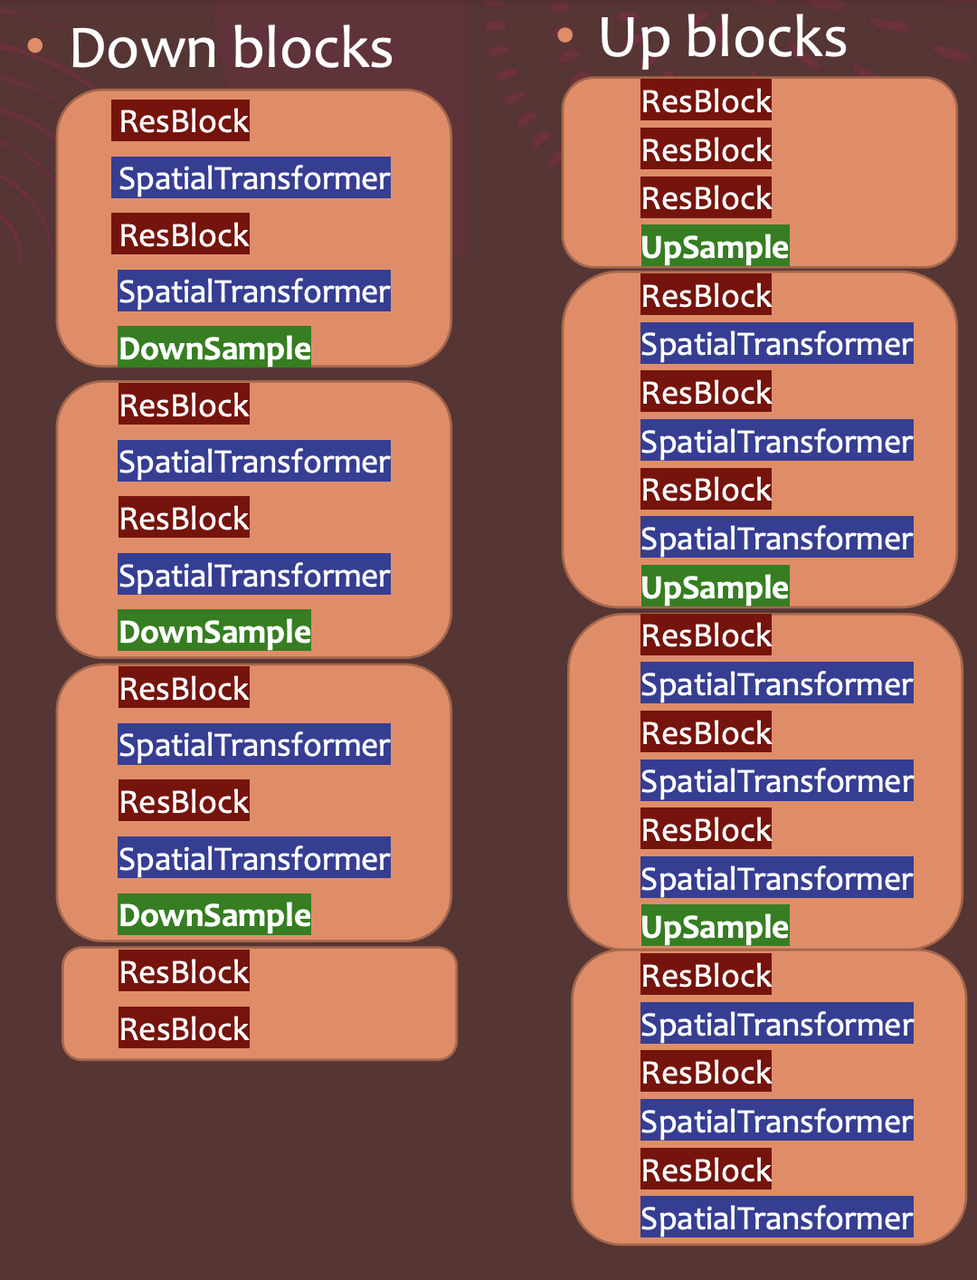
Below is the use of Cross Attention in the context of U-Net. ResBlock is conv layer in Unet, and SpatialTransformer is Cross Attention.
Cross attention is a general purpose conditioning mechanism that enables multi-modal learning. It is helpful to train class-conditional, text-to-image and layout-to-image models.
3. Other details
3.1 Stable Diffusion training data
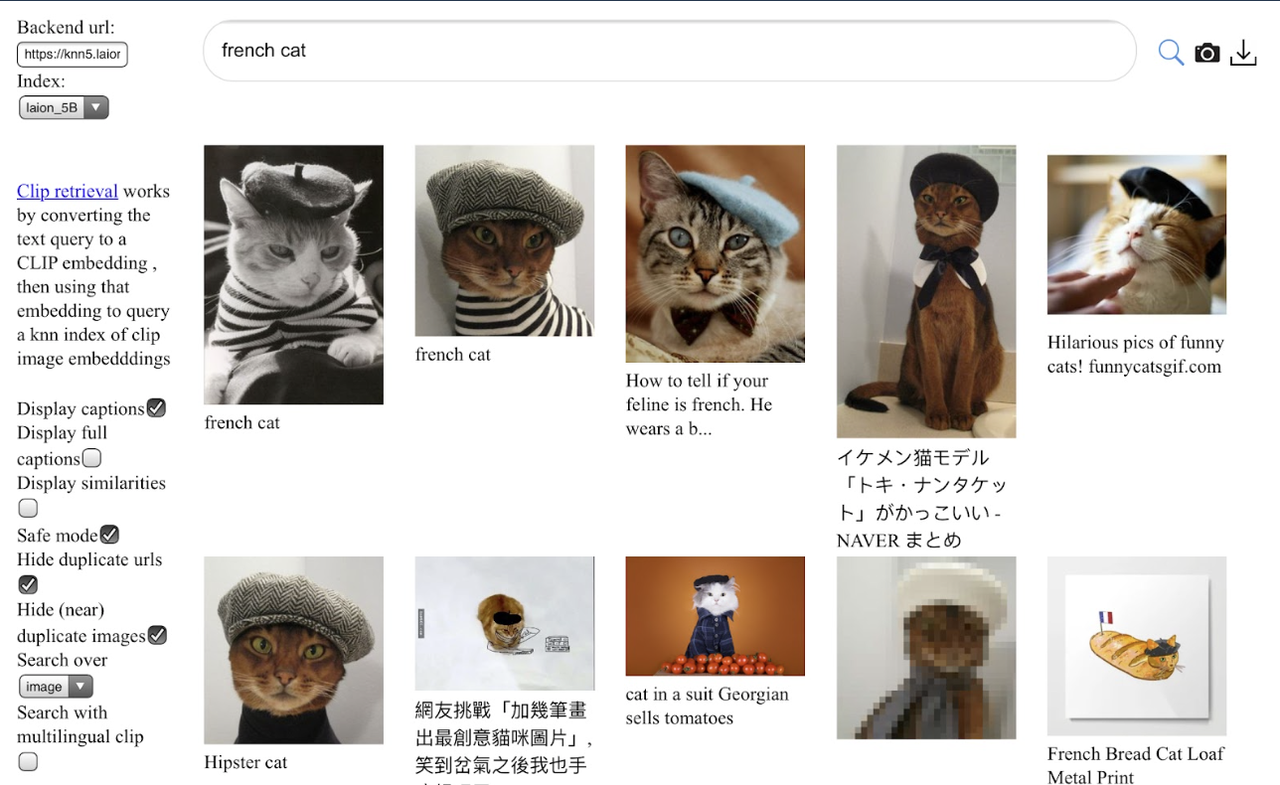
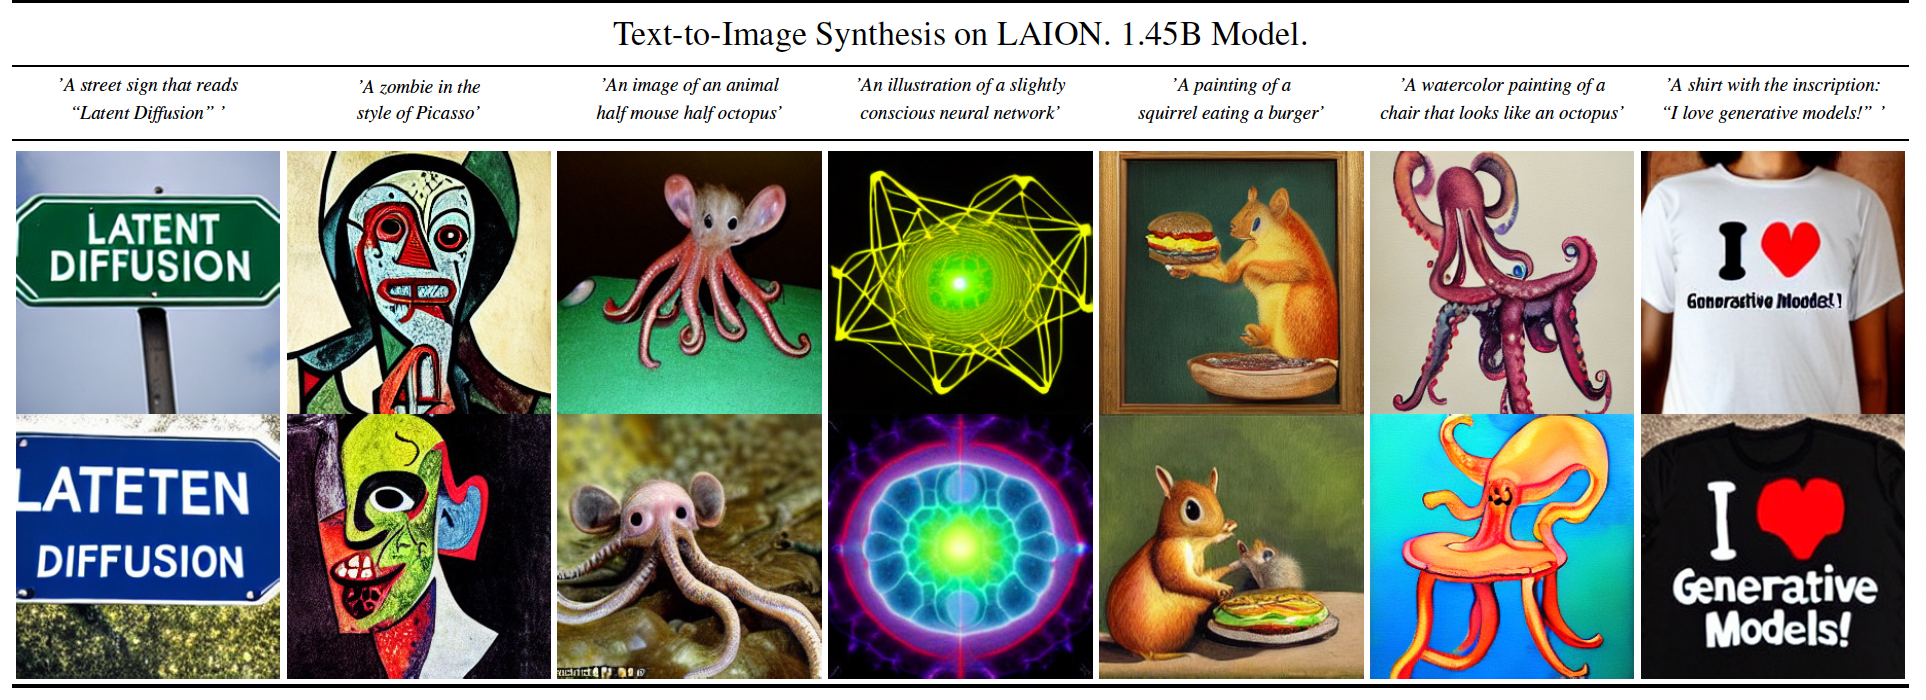
Stable Diffusion is trained on ~2 Billion image–caption (English) pairs.
Scraped from web, filtered by CLIP: https://laion.ai/blog/laion-5b/
Input image (3, 512, 512) tensor –> 𝑧 is (4, 64, 64) latent tensor
3.2 Downstream Applications of Diffusion models
As Denoising U-net model can take in various kinds of conditioning, we can rely on that to inject different modalities to the model. Recalling the conditioning part of the architecture:
The obvious use case we have seen so far is text-to-image, which takes in a text prompts, and generates an image based on the text. There are other use cases in the image-to-image translation side: layout-to-image, image inpainting, super resolution.
- Text-to-image
Input: text
Output: image as described in the text
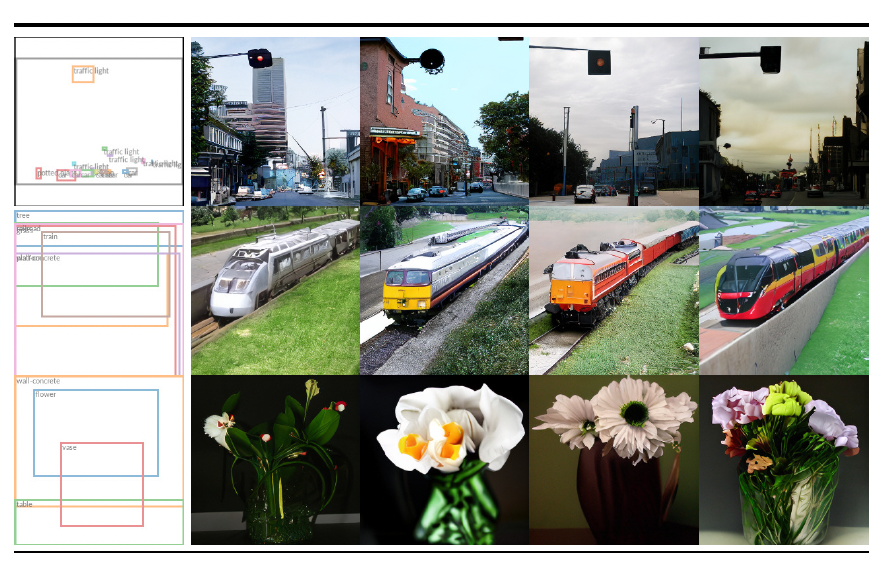
- Layout-to-image
Layout refers to a blank canvas with bounding boxes on them to indicate where an object should be. In the paper, they use layout from the labels of object detection dataset MS-COCO.
Input: bounding boxes of objects
Output: Image that has objects matched with the bounding boxes
- Image inpainting
Inpainting is the task of filling masked regions of an image with new content either because parts of the image are corrupted or to replace existing but undesired content within the image.
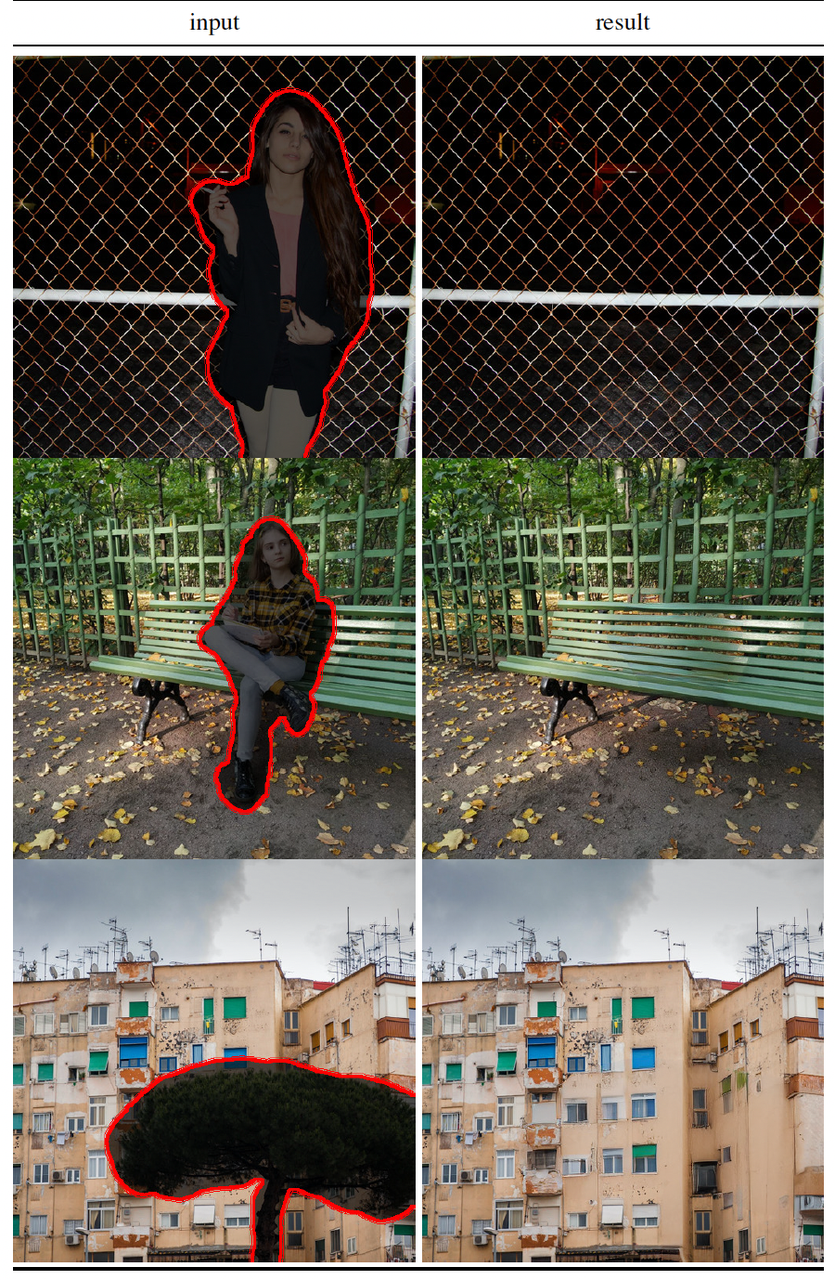 | Input: image with object Output: image with object removed |
- Super-resolution
Super resolution is a task to make a lower resolution image become clearer and higher resolution.
Input: image with low resolution
Output: image with high resolution

3.3 Other types of image generative models
Recall that Stable diffusion is a likelihood-based model, latent diffusion over a U-net backbone architecture. It is the SoTA in density estimation and sample quality
These are other image generative models:
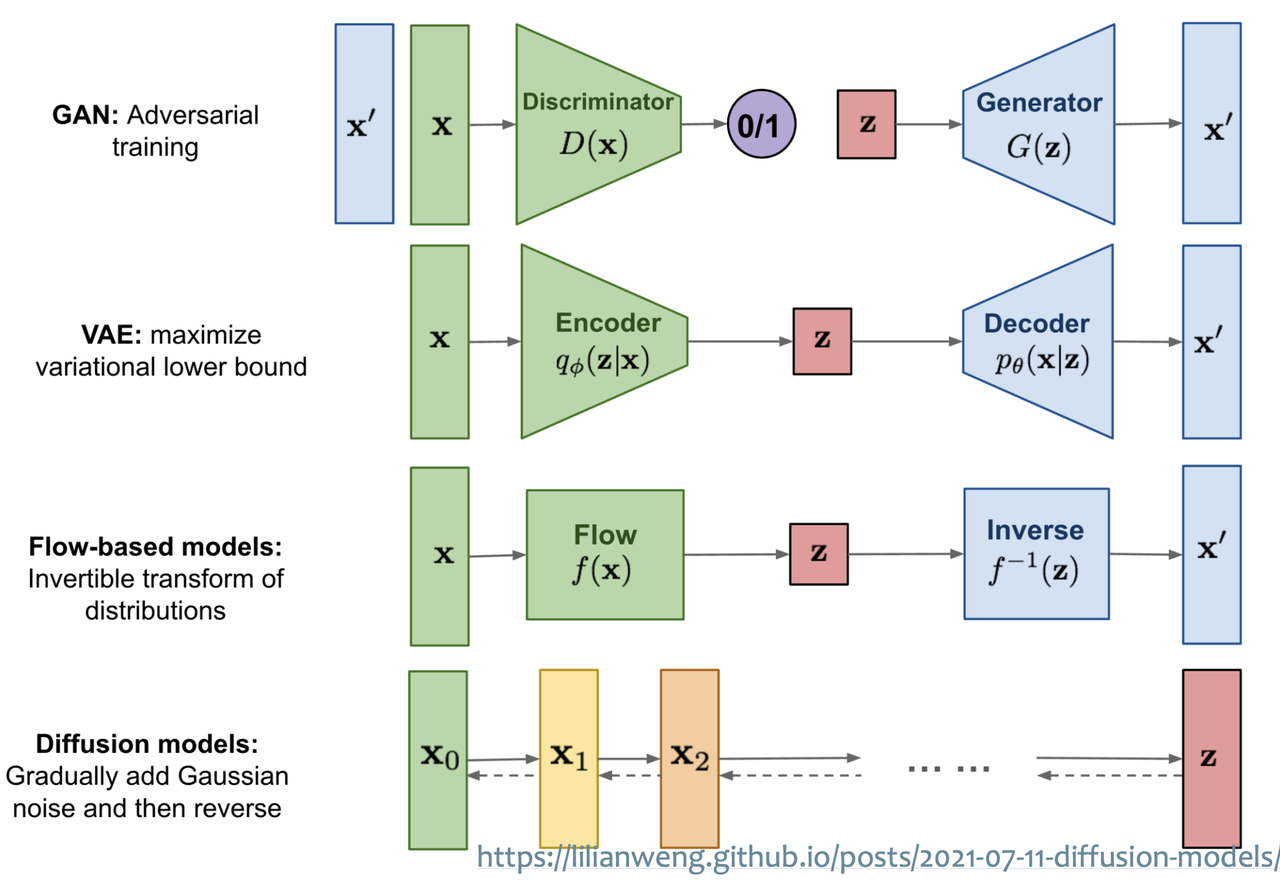
GAN: adversarial learning. Does not easily scale to modeling complex, multi-modal distributions. Suffered from mode collapse and training instabilities. Mode collapse also prevents the model to capture full data distribution
VAE and flow-based models: enable efficient synthesis of high resolution images, but sample quality is not on par with GANs
Autoregressive models: strong performance in density estimation, but computationally demanding because of sequential sampling process
Normal Diffusion models (not to be confused with Latent Diffusion models): SoTA in density estimation and sample quality. However, training and evaluating in pixel space is computationally intensive.
Two-stage image synthesis: VQ-VAE (autoregressive models to learn an expressive prior over a discretized latent space), VQGAN (adversarial + autoregressive). Autoregressive manner needs a lot more parameters.
4. Practical usage
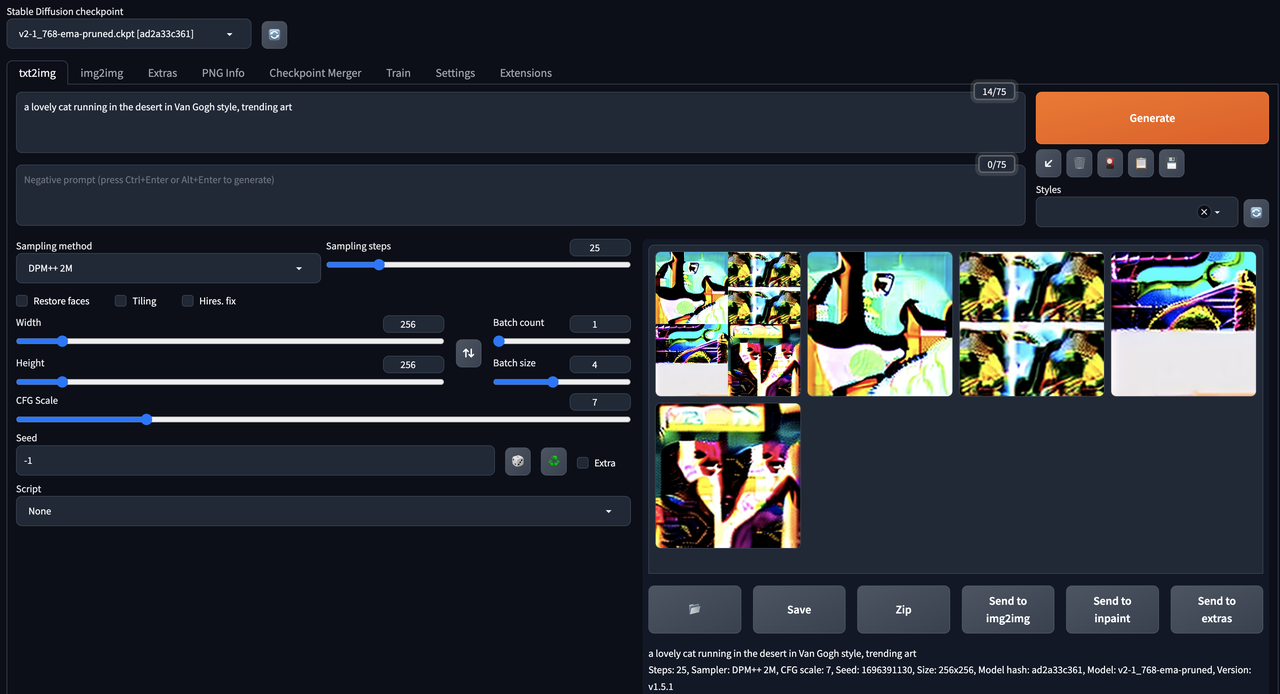
4.1 Local run
Model weights: You can download the model weights from HuggingFace and run inference on the command line
Visualization tool: You can also clone stable diffusion web-ui to have a locally hosted Web UI. It is easier to configure for hyperparameters using the web UI
Installation guide on a Mac:
# 1. Install brew packages
brew install cmake protobuf rust

# 2. Install Stable Diffusion UI
git clone https://github.com/AUTOMATIC1111/stable-diffusion-webui

# 3. Go to Hugging face to download any .ckpt file:
# https://huggingface.co/models?other=stable-diffusion

# 4. Put model checkpoint at stable-diffusion-webui/models/Stable-diffusion/.

# 5. Install python 3.10
conda create --name py310 python=3.10
conda activate py310

# 6. Start webui at root folder
./webui.sh
The shell output should include a line “Running on local URL: http://127.0.0.1:7860”. Go to the localhost site for the web UI
Settings details: https://stable-diffusion-art.com/automatic1111/
4.2 Hosted HuggingFace spaces
HuggingFace spaces uses GradIO which is a front-end python wrapper, best known to quickly spin up web interfaces for ML inference visualization and hyperparameter tuning.
Collection of Stable Diffusion models: https://huggingface.co/spaces?p=1&sort=modified&search=stable+diffusion
Sample of hosted Stable Diffusion model you can play around: https://huggingface.co/spaces/runwayml/stable-diffusion-v1-5
5. Takeaways
Here are the key things I want you to take away from this article.
Stable Diffusion is a system of models that can generate realistic images from a text or image input. Components that we need to:
Compress image –> use VAE
Link text to image –> use CLIP or any text-image representation model
Generate new image –> use Forward/Reverse Diffusion model
Inject good inductive bias –> U-net + Cross Attention
Working with Latent space is more preferred and easier to scale than pixel space